
Replacing a shutter curtain of Fed Zaria

 October 2008: at delivery of my Zaria, disappointment: the shutter works badly ("gummed") and the first curtain lets light through. Should I leave it in it's original state or fix it? Having found that the curtains of the last Zenit are apparently identical to the original curtains, I decided to repair. I found on eBay new curtains (£ 5 +£ 5 fees in the moscowphoto shop), which arrived Saturday December 6. Beginning towards 6pm, I finished at 2am Sunday (includes assembling my photographic studio, shooting and evening meal ...)
 The curtains of Fed, Zorki and Zenit are made of rubberized fabric. I call first curtain the one which appears when the shutter is cocked, and which opens first when releasing. At rest, it is wound around a spindle. If the camera remains unused for too long, it may be stuck on itself, and a part of the rubber is torn off and remains on the opposite side when cocking. That is what happened on my camera, leaving an area of 2cm by a half which lets light through.
 To begin, remove the knobs; from left to right: the rewind knob, screwed on it's shaft, the shutter speed selector (2 small side screws), the rewind release knob (1 side screw, then unscrew ), the cocking knob and below it the frame counter wheel (1 side screw, missing on my unit, then unscrew). Beware of order and direction of parts, the picture is convenient for remembering. The top cover is held by three chrome screws (2 on the front, 1 back) plus the black screw hidden by the counter wheel. That's all, don't touch the accessory shoe.

 Seen from above, the Zaria is an empty box! you can see the shutter speed selection mechanism (a wheel with notches and the selector which adapts to it), the second curtain release lever and it's spring, the shutter-release button, the flash contact...
 The parts to remove:-The shutter-speed selection mechanism (unscrew the cylindrical piece which has the red dot mark, remove the selector avoiding losing the spring, remove the notched wheel (one side screw)-The second curtain release lever on its shaft, the spring remains on the body.-The shutter-release and the rewind-release mechanisms (one side screw , then everything comes, careful not to lose)I have put back the cocking knob, it helps positioning and giving access to the screws for removing.
 You can now remove the block containing the shutter: remove the 4 chrome screws on the front, plus the two ones shown here, and the whole block comes.

 Only remain the two spring adjustment nuts to remove the curtains and axes.
 You can see the part of the curtain where the rubber is gone!
 I carefully marked the location (red felt pen lines) for the new curtain straps (needs a half-millimeter precision). I suppose that the factory had specially designed gauges, which I do not know what they might look like. I proceeded by superposing the two curtains; the new curtain straps are longer than those of origin, they will hold better. I had to reduce by one mm each side the new curtain, broader than the FED one.I do not know what kind of glue is usually used; after careful consideration, I decided to use double-sided adhesive, which has the advantage, considering the delicacy of the assembly, of allowing repositionning if it does not fit(it took me three times for getting the 2 ribbons well aligned).I did not touch the 2nd curtain, but the straps went by themselves unstuck from the shaft. Hope my double-sided tape will last as long (the Zaria was manufactured between 1959 and 1962).
 The new curtain is in place, the two spring shafts are ready for receiving: the curtain for the left one, the straps of the second curtain for the other. No positioning difficulty on this side, but for being perfectly perpendicular to the axes, I worked over a sheet of graph paper to do my sticking.
 Then I reinstalled the whole into the shutter block, no problem except the overlay order of the curtains, I compared with another camera to avoid an error: the first curtain is on the bottom (film side), the straps of the second one "cross" the first curtain. I'm not sure my drawing is very clear...
Before proceeding to reassembly, I disassembled, cleaned and lubricated (pink grease and vaseline oil) all the elements which seemed to need it, among other things the parts in the axis of the shutter-release button.
 Two pieces are problematic to settle the shutter block back in place: in 1, this part which controls the second curtain has to enter the corresponding hole in the curtain drum. In 2 this pinion used for cocking, then for releasing the shutter, dosn't stay in place, I should have three hands!
 Once the shutter block finally in place and screwed, I made a first (temporary) setting of the curtains tension (2-3 laps) prior to adjusting the curtains position.
 Under a cover at the base of the shutter...
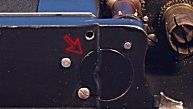
 ...the pine nut between "pinion N°2 of the top photo" and pinion of the curtains drum, has stops. You must adjust the position of N°1 curtain over the exposure window according to the two stop positions: too close to the spring shaft, it disturbs the shutting of the second curtain, on the other side it must not be too close to the drum. I have found only one notch possible for a proper functioning. For the moment the speed selector is not in place, the two curtains moving together. No need to watch the 2nd curtain, it's right place depends only on the accuracy of sticking on the drum.The handling is the same for the Zenit, except for a detail: you must synchronize all this with the mechanism controlling the mirror on the same set of pine nuts, I can predict happy evenings!
 To make the tuning easier, I have already put back in place the shutter-release mechanism, and (temporarily) the cocking knob. The lens is only there to keep the camera up for photos!
 There, I settled back in place the speed setting mechanism and made a quick check. I manage to find "B" speed position, for then to place the selector ring in proper position. I also removed during the curtains reassembly their upper and lower caches(inside the exposure chamber) the screws of lower cache also hold the blade which returns back up the release button. Only remains to put the top cover and knobs back, in reverse of removal.
Last step once the camera reassembled: the setting of the shutter using the two curtain-tension screws. Not convenient to handle, I'll have to make a special key to turn lock-nuts. Setting "by ear" in comparison with other cameras (Fed, Zorki) I get a result that seems amazing with seven screw turns for bending each spring (more seems dangerous, the cocking becomes hard).Do not forget, to finish, the screws locking the lock-nuts!
December, 8th: I made a key for turning the lock nuts:
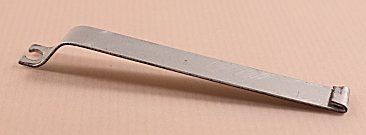 I cut this tool in a piece of metal taken from a computer case!
 I should be able to use it for all the textile shutters of Fed, Zorki and Zenit.
 You know what? After all that, my little toy works wonderfully! I already thought the Zaria was very nice, but with in addition a shutter that works well with a nice noise, I love it!To demonstrate the replacement of curtain, it is the ideal tool because the simplest; for other models, there's more: rangefinder, low speeds mechanism, self-timer, second curtain shock absorber, cocking lever (Fed3, Zorki 4...), and pentaprism and mirror (Zenit). The base is the same, with a few things more to disassemble, to avoid disturbing, to synchronize...